How to Run Serverless Containers in AWS EKS With Fargate and Knative
Recently, a customer reached out with an interesting request. They wanted us to run containers in serverless mode with AWS EKS. Their intention was to use Kubernetes features and run containers in serverless mode.
Side note: In EKS you should manage NodeGroups and pay for it. After a bit of research, we discovered that we can leverage Fargate to run containers on EKS.
In this article, we’ll explore how Fargate can be used with EKS to make deploying and running your Kubernetes apps on AWS easier than ever. Before we get into how to deploy and run your apps in AWS, let’s cover a few fundamentals about the technology you’ll use.
—
Table of contents
- Introduction to AWS EKS
- Introduction to AWS Fargate
- Set up EKS with Fargate profile
- Deploy ALB Ingress
- Deploy Sample App
- Summary
—
What is Elastic Kubernetes Service (EKS)?
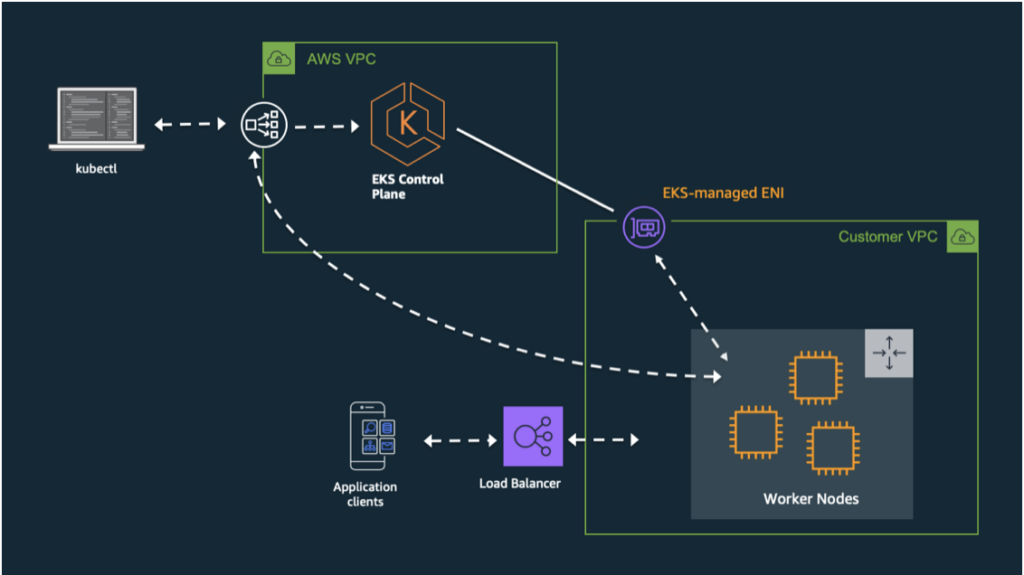
Elastic Kubernetes Service is the managed Kubernetes service offering from AWS. It automates administrative tasks, like deployment of the K8s control plane, updating management, patching, node provisioning and more. This allows customers to focus on packaging and deploying their applications to the cluster.
What is AWS Fargate?
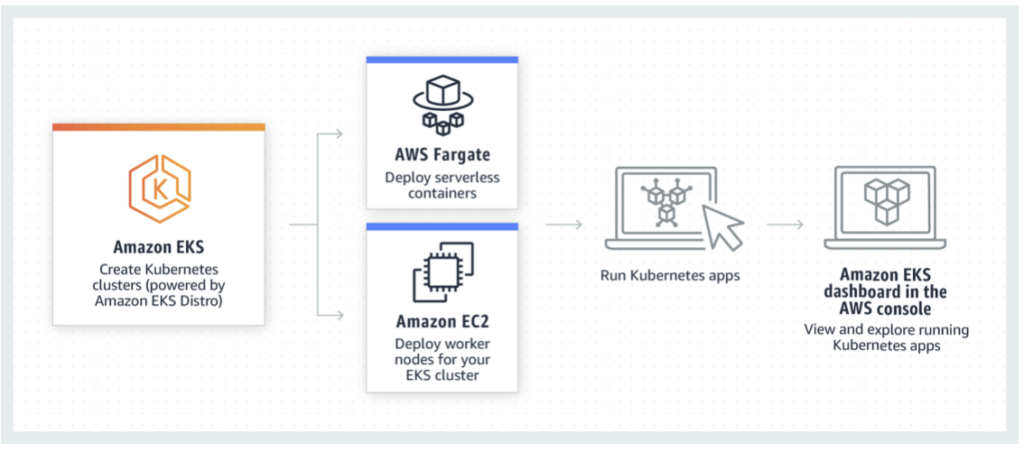
AWS Fargate enables customers to deploy containers without the need to, or the challenge of, creating and managing servers. It’s also flexible enough to be integrated with ECS and EKS to efficiently run workloads. This approach is especially cost-effective for businesses. Waste is eliminated as you only utilize compute resources needed to run containers created, saving you from overconsumption.
And this is considerably valuable for businesses that are planning to scale their requirements. Costs can also be lowered through Fargate Spot and compute savings plans. In fact, you can realize up to 70% savings for workloads tolerant to interruptions and up to 50% for persistent workloads.
Operational overhead is eliminated, too. This is possible as all backend infrastructure for hosting the containers is created and maintained. You don’t have to worry about ensuring updated patches are installed – it’s all taken care of by Fargate as and when required. This also means that typically essential infrastructure maintenance activities like scaling, installing patches and securing your environment all fall away.
Security is also a common concern. The good news is all pods deployed in Fargate are secure. When they’re run in isolated runtime environments, they’re also free from resource sharing. And for observability, Amazon’s CloudWatch Container Insights solution comes as an out-of-the-box application providing runtime metrics and logs.
Run Serverless Pods Using AWS Fargate and EKS
Something we appreciate about AWS is its ability to accommodate EC2 and Fargate. You’ll be able to establish a serverless data plane for certain use cases and constantly run K8s worker nodes when an application requires resources in a hurry.
If this functionality appears complex and you’re wondering how it’s possible to keep them separate, this is where defining Fargate profiles becomes essential. Fargate profiles allow a Fargate-AWS infrastructure communication link and they assign a scheduler (Fargate or EKS).
Serverless workloads utilize Kubernetes’s defined namespace in a Fargate profile. Fargate profiles then give an engineer the ability to declare which pods will run on Fargate by using a profile’s selectors. AWS then allows you to work with as many as five selectors containing a namespace. Pods matching a selector (by matching the namespace) are then easily scheduled on Fargate.
Getting Started
Before we dive into our tutorial, here are a few prerequisite tools you’ll need:
- AWS CLI – CLI tool for working with AWS services, including Amazon EKS
- kubectl – CLI tool for working with Kubernetes Clusters
- eksctl – CLI tool for working with EKS clusters
You’ll also need a relevant IAM user with programmatic access and a relevant role to create EKS, IAM policy and role.
$ aws configure
export REGION=us-west-1
export CLUSTERNAME=eksfargate
$ eksctl create cluster –name=$CLUSTERNAME –region=$REGION –fargate
2022-10-09 23:39:46 [ℹ] eksctl version 0.73.0
2022-10-09 23:39:46 [ℹ] using region us-west-1
2022-10-09 23:39:47 [ℹ] setting availability zones to [us-west-1c us-west-1b us-west-1c]
2022-10-09 23:39:47 [ℹ] subnets for us-west-1c – public:192.168.0.0/19 private:192.168.96.0/19
2022-10-09 23:39:47 [ℹ] subnets for us-west-1b – public:192.168.32.0/19 private:192.168.128.0/19
2022-10-09 23:39:47 [ℹ] subnets for us-west-1c – public:192.168.64.0/19 private:192.168.160.0/19
2022-10-09 23:39:47 [ℹ] using Kubernetes version 1.21
2022-10-09 23:39:47 [ℹ] creating EKS cluster “eksfargate“ in “us-west-1“ region with Fargate profile
2022-10-09 23:39:47 [ℹ] if you encounter any issues, check CloudFormation console or try ‘eksctl utils describe-stacks –region=us-west-1 –cluster=eksfargate‘
2022-10-09 23:39:47 [ℹ] CloudWatch logging will not be enabled for cluster “eksfargate“ in “us-west-1“
2022-10-09 23:39:47 [ℹ] you can enable it with ‘eksctl utils update-cluster-logging –enable-types={SPECIFY-YOUR-LOG-TYPES-HERE (e.g. all)} –region=us-west-1 –cluster=eksfargate‘
2022-10-09 23:39:47 [ℹ] Kubernetes API endpoint access will use default of {publicAccess=true, privateAccess=false} for cluster “eksfargate“ in “us-west-1“
2022-10-09 23:39:47 [ℹ]
2 sequential tasks: { create cluster control plane “eksfargate“,
2 sequential sub-tasks: {
wait for control plane to become ready,
create fargate profiles,
}
}
2022-10-09 23:39:47 [ℹ] building cluster stack “eksctl-eksfargate-cluster“
2022-10-09 23:39:49 [ℹ] deploying stack “eksctl-eksfargate-cluster“
2022-10-09 23:40:19 [ℹ] waiting for CloudFormation stack “eksctl-eksfargate-cluster“
2022-10-09 23:40:50 [ℹ] waiting for CloudFormation stack “eksctl-eksfargate-cluster“
2022-10-09 23:41:52 [ℹ] waiting for CloudFormation stack “eksctl-eksfargate-cluster“
2022-10-09 23:42:53 [ℹ] waiting for CloudFormation stack “eksctl-eksfargate-cluster“
2022-10-09 23:43:54 [ℹ] waiting for CloudFormation stack “eksctl-eksfargate-cluster“
2022-10-09 23:44:55 [ℹ] waiting for CloudFormation stack “eksctl-eksfargate-cluster“
2022-10-09 23:45:56 [ℹ] waiting for CloudFormation stack “eksctl-eksfargate-cluster“
2022-10-09 23:46:58 [ℹ] waiting for CloudFormation stack “eksctl-eksfargate-cluster“
2022-10-09 23:47:59 [ℹ] waiting for CloudFormation stack “eksctl-eksfargate-cluster“
2022-10-09 23:49:00 [ℹ] waiting for CloudFormation stack “eksctl-eksfargate-cluster“
2022-10-09 23:50:02 [ℹ] waiting for CloudFormation stack “eksctl-eksfargate-cluster“
2022-10-09 23:51:03 [ℹ] waiting for CloudFormation stack “eksctl-eksfargate-cluster“
2022-10-09 23:53:11 [ℹ] creating Fargate profile “fp-default“ on EKS cluster “eksfargate“
2022-10-09 23:57:32 [ℹ] created Fargate profile “fp-default“ on EKS cluster “eksfargate“
2022-10-10 00:00:07 [ℹ] “coredns“ is now schedulable onto Fargate
2022-10-10 00:01:13 [ℹ] “coredns“ is now scheduled onto Fargate
2022-10-10 00:01:14 [ℹ] “coredns“ pods are now scheduled onto Fargate
2022-10-10 00:01:14 [ℹ] waiting for the control plane availability…
2022-10-10 00:01:14 [✔] saved kubeconfig as “/Users/babak/.kube/config“
2022-10-10 00:01:14 [ℹ] no tasks
2022-10-10 00:01:14 [✔] all EKS cluster resources for “eksfargate“ have been created
2022-10-10 00:01:16 [ℹ] kubectl command should work with “/Users/demo/.kube/config“, try ‘kubectl get nodes‘
2022-10-10 00:01:16 [✔] EKS cluster “eksfargate“ in “us-west-1“ region is ready
Export Kubernetes Auth Config and connect it.
$ export KUBECONFIG=/Users/babak/Desktop/Workspace/2bCloud/k8s_configs/aws-demo-aks.config
$ aws eks –region $REGION update-kubeconfig –name $CLUSTERNAME
Check Default pods
$ kubectl get pods -A
NAMESPACE NAME READY STATUS RESTARTS AGE
kube-system coredns-65c6c5fc9b-77m6p 1/1 Running 0 49m
kube-system coredns-65c6c5fc9b-spqgc 1/1 Running 0 49m
Deploy Alb Ingress Controller for accessing outside of eks
$ eksctl utils associate-iam-oidc-provider –region $REGION –cluster $CLUSTERNAME –approve
$ curl -sS https://raw.githubusercontent.com/kubernetes-sigs/aws-alb-ingress-controller/v1.1.4/docs/examples/iam-policy.json > albiampolicy.json
$ aws iam create-policy –policy-name ALBIngressControllerIAMPolicy –policy-document file://albiampolicy.json
# Copy ARN and use it below
$ kubectl apply -f https://raw.githubusercontent.com/kubernetes-sigs/aws-alb-ingress-controller/v1.1.4/docs/examples/rbac-role.yaml
$ eksctl create iamserviceaccount –region $REGION –name alb-ingress-controller –namespace kube-system –cluster $CLUSTERNAME –attach-policy-arn arn:aws:iam::346450447852:policy/ALBIngressControllerIAMPolicy –override-existing-serviceaccounts –approve
$ kubectl apply -f https://raw.githubusercontent.com/kubernetes-sigs/aws-alb-ingress-controller/v1.1.4/docs/examples/alb-ingress-controller.yaml
We will use it for ALB
$ vpc_id=$(aws eks describe-cluster –name $CLUSTERNAME –region $REGION –query “cluster.resourcesVpcConfig.vpcId“ –output text)
ALB should be set up same region and vpc for forwarding AWS ALB requests to pods within same network
$ kubectl edit deployment.apps/alb-ingress-controller -n kube-system
spec:
containers:
– args:
– –ingress-class=alb
– –cluster-name=$CLUSTERNAME
– –aws-vpc-id=$vpc_id
– –aws-region=$REGION
Check Pods of ALB
$ kubectl get pods -n kube-system
NAME READY STATUS RESTARTS AGE
alb-ingress-controller-97989fc4c-wn25r 1/1 Running 0 107s
coredns-65c6c5fc9b-77m6p 1/1 Running 0 80m
coredns-65c6c5fc9b-spqgc 1/1 Running 0 80m
# Check ALB Logs and if you face tag error to fetch needed subnets you can use this link
$ kubectl -n kube-system logs -f alb-ingress-controller-97989fc4c-wn25r
https://aws.amazon.com/premiumsupport/knowledge-center/eks-vpc-subnet-discovery/
Deploy Sample App: We created 5 replica , service and ing. in this case we will see our new fargate instances will created.
$ kubectl get pods
NAME READY STATUS RESTARTS AGE
web-68977fb86f-27ds4 1/1 Running 0 2m7s
web-68977fb86f-6nldg 1/1 Running 0 2m7s
web-68977fb86f-g86xf 1/1 Running 0 2m7s
web-68977fb86f-jh6cn 1/1 Running 0 2m7s
$ kubectl get svc
NAME TYPE CLUSTER-IP EXTERNAL-IP PORT(S) AGE
kubernetes ClusterIP 10.100.0.1 <none> 443/TCP 97m
nginx-service NodePort 10.100.76.103 <none> 80:30422/TCP 2m18s
$ kubectl get ing
NAME CLASS HOSTS ADDRESS PORTS AGE
nginx-ingress <none> * df61f007-default-nginxingr-29e9-1962103715.us-west-1.elb.amazonaws.com 80 18m
Then we copy paste the address of this rule and we will see our simple app open to the world.
Now let’s check aws eks node count
$ kubectl get nodes
NAME STATUS ROLES AGE VERSION
fargate-ip-192-168-133-59.us-west-1.compute.internal Ready <none> 19m v1.21.9-eks-14c7a48
fargate-ip-192-168-135-0.us-west-1.compute.internal Ready <none> 19m v1.21.9-eks-14c7a48
fargate-ip-192-168-137-84.us-west-1.compute.internal Ready <none> 101m v1.21.9-eks-14c7a48
fargate-ip-192-168-140-151.us-west-1.compute.internal Ready <none> 19m v1.21.9-eks-14c7a48
fargate-ip-192-168-168-64.us-west-1.compute.internal Ready <none> 5m36s v1.21.9-eks-14c7a48
fargate-ip-192-168-177-130.us-west-1.compute.internal Ready <none> 19m v1.21.9-eks-14c7a48
fargate-ip-192-168-187-216.us-west-1.compute.internal Ready <none> 101m v1.21.9-eks-14c7a48
fargate-ip-192-168-188-117.us-west-1.compute.internal Ready <none> 19m v1.21.9-eks-14c7a48
You can see eight nodes; two for coreDNS, one for alb and five for the nginx pods deployed. If you delete the deployment once the testing is complete and check the number of nodes, you’ll see that the additional nodes created for deploying the nginx application are no longer listed
$ kubectl delete deployment web
k get nodes
NAME STATUS ROLES AGE VERSION
fargate-ip-192-168-137-84.us-west-1.compute.internal Ready <none> 103m v1.21.9-eks-14c7a48
fargate-ip-192-168-168-64.us-west-1.compute.internal Ready <none> 7m30s v1.21.9-eks-14c7a48
fargate-ip-192-168-187-216.us-west-1.compute.internal Ready <none> 103m v1.21.9-eks-14c7a48
Check App
In this case, we deployed a web app, so checking if the app is running is simple.
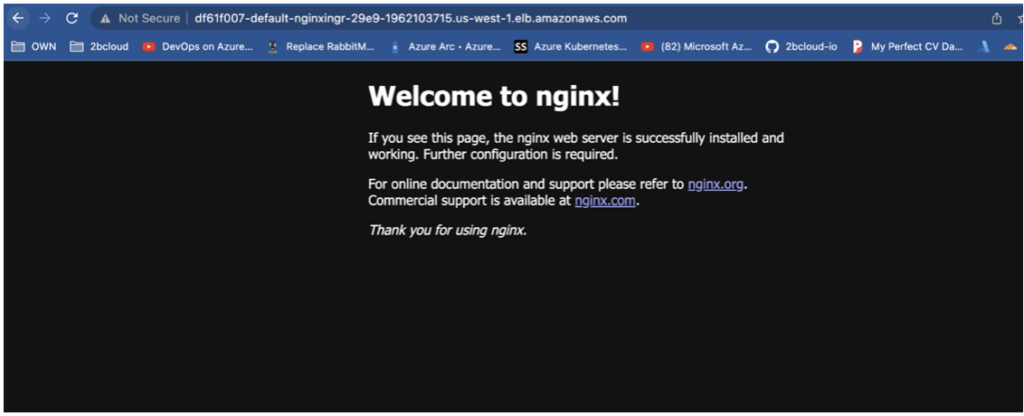
Log on via the URL of the ELB, which is balancing the traffic to our application’s deployment.
In the image below, you’ll see we can reach the nginx demo page bundled, along with a vanilla deployment of the pods.
Summary
It’s possible to easily extend the EKS cluster by using Fargate where your compute resources are created on-demand for deployments. This approach is a prudent and highly efficient way of establishing the optimal compute and costs for running your containerized workloads. Using pods in Fargate offers more security as they run in isolated environments and don’t share resources.
Deploying serverless K8 pods in AWS EKS and Fargate also saves money. Any sudden capacity requirements don’t have the expense typically associated with backend nodes. It’s possible to run test and development scenarios, allowing the quick setup of test environments easily decommissioned with minimal overhead.


